-350_正上方图.jpg)
mBlock programming introduction
1.Overview
mBlock is an innovative way to learn programming. It is based on Scratch 2.0, which is graphical programming software popular in many schools.
2.Operation process
2.1 Download and install mBlock
- 1.To download or to update mBlock to version v3.4.6, go to:http://www.mblock.cc/download
- Install the USB driver:
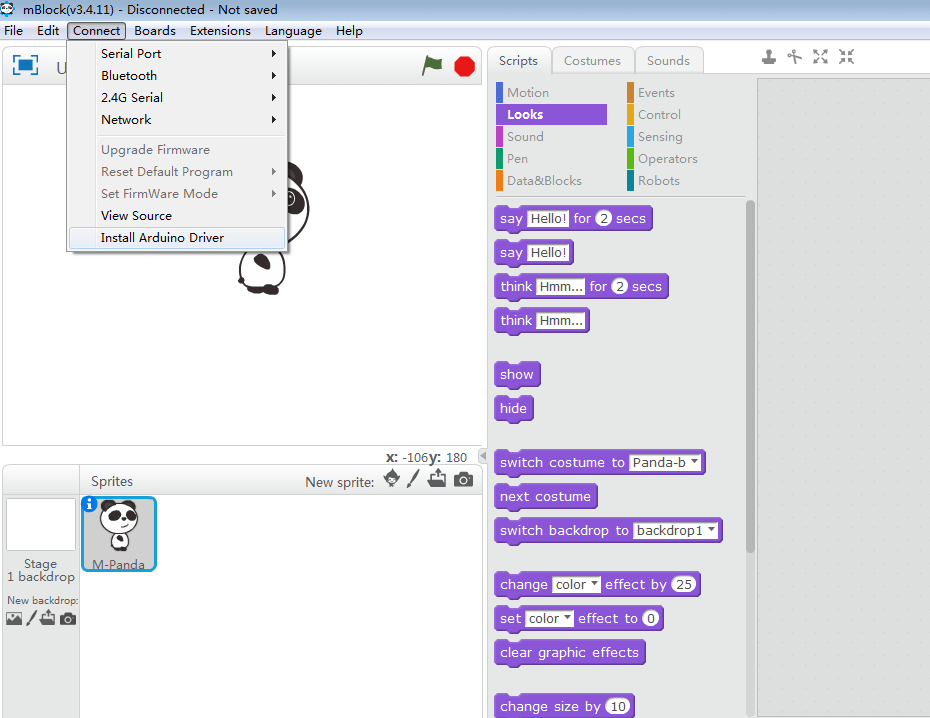
If this is your first time to install mBlock, please also install the USB driver, so that the USB data cable can control Smart Servo.
As shown in the figure, click “Connect” and then click “Install Arduino Driver”.
2.2 Port selection
- Steps::
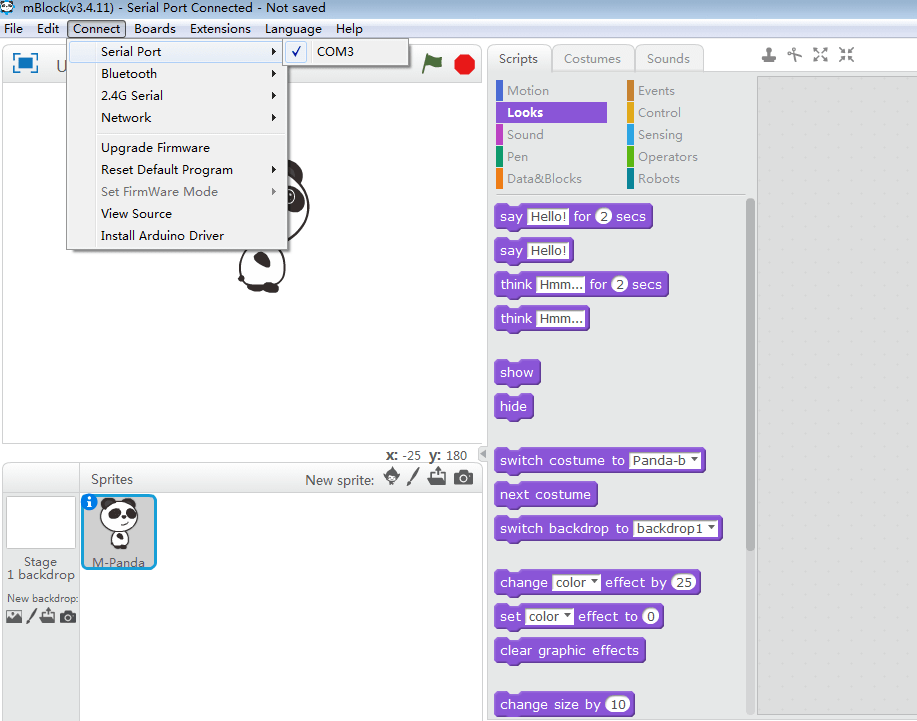
Connect the Auriga mainboard to the computer via a USB cable.
2. Make sure that the Auriga mainboard is turned on (using the power switch);
3. Select “Connect” – “Serial Port”. In the serial port option of mBlock’s tool menu, you may see multiple COM ports. After connecting the Auriga mainboard to the computer via the USB cable, a new COM port will appear. Select this COM port. (Note: number of Serial COM ports changes on different computers)
Select serial port
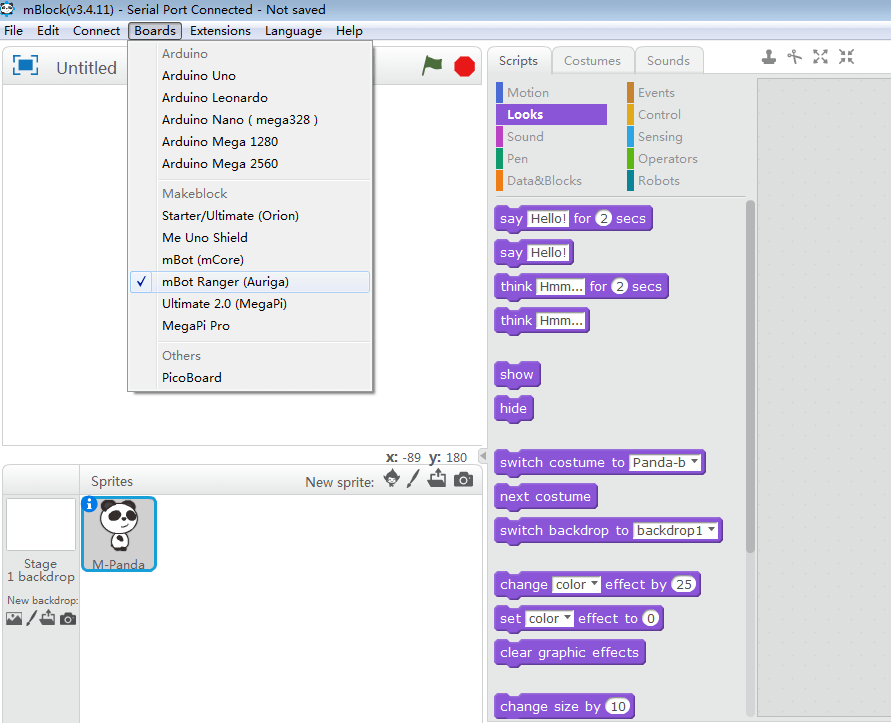
Select mainboard type
2.3 Upgrade firmware
Before using mBlock to control the Smart Servo, upgrade the Auriga mainboard firmware. Choose “Connect” – “Upgrade Firmware” to complete the upgrade.
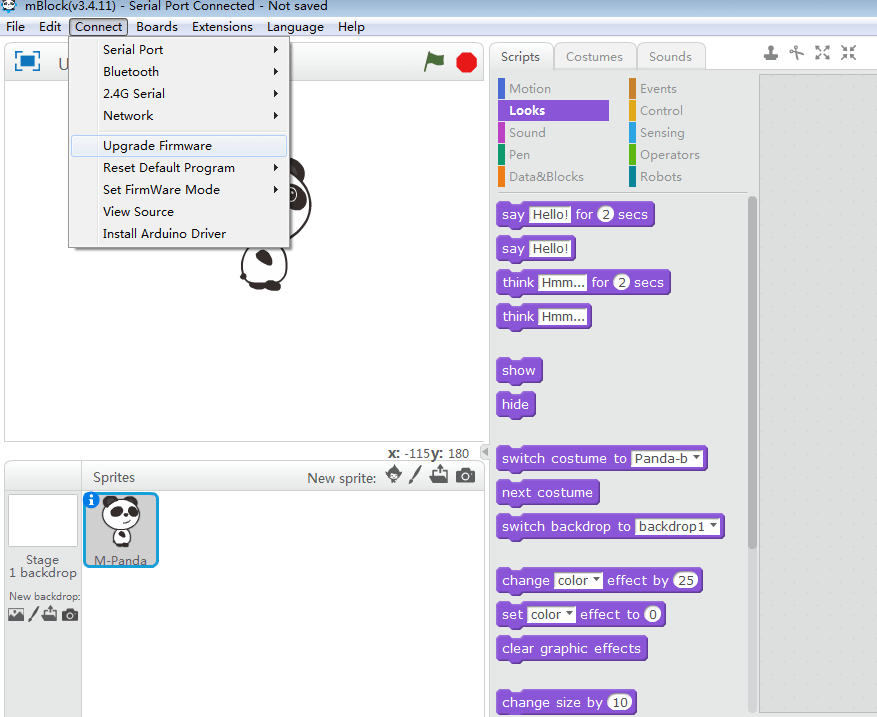
2.4 Control Smart Servo
Before using the mBlock to control the Smart Servo, add the Smart Servo control module.
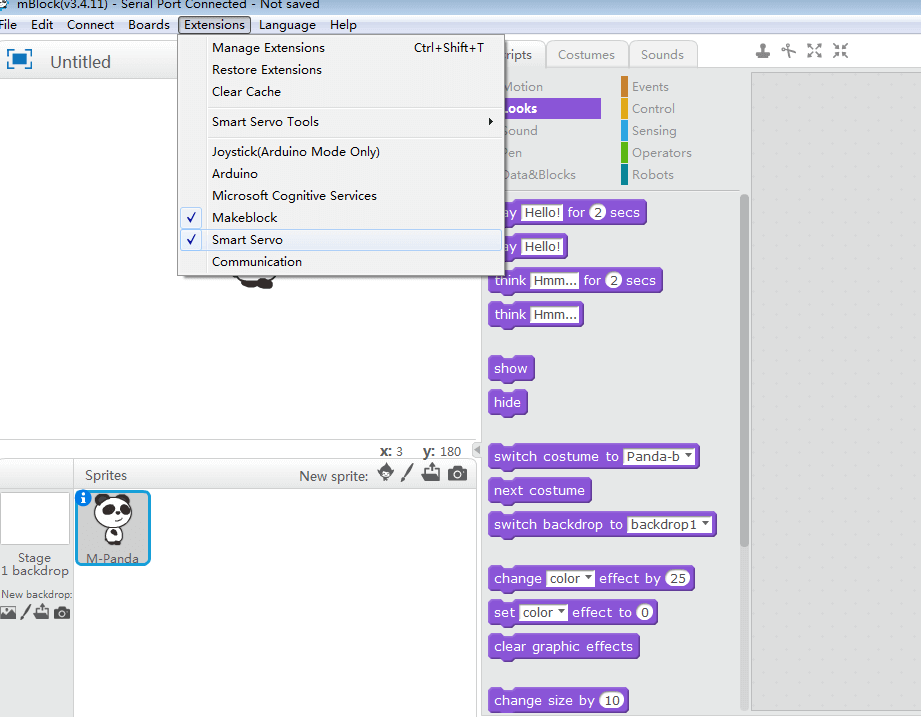
Check Smart Servo
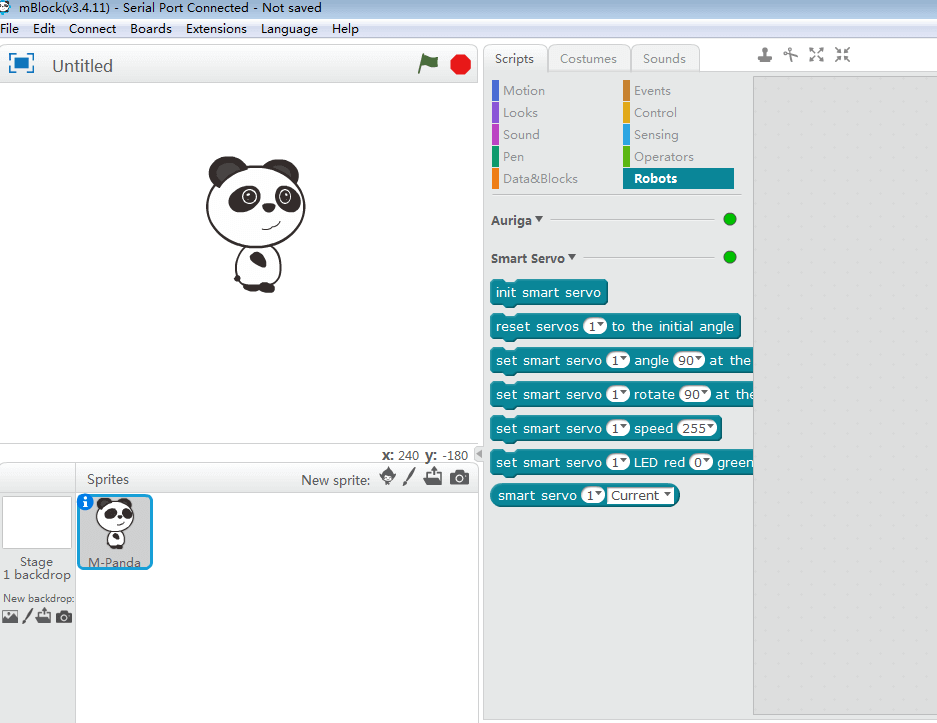
This block has been added. The original block supported by the Auriga mainboard has been hidden under Auriga.
3.Smart Servo block instructions
[Setup Instructions]
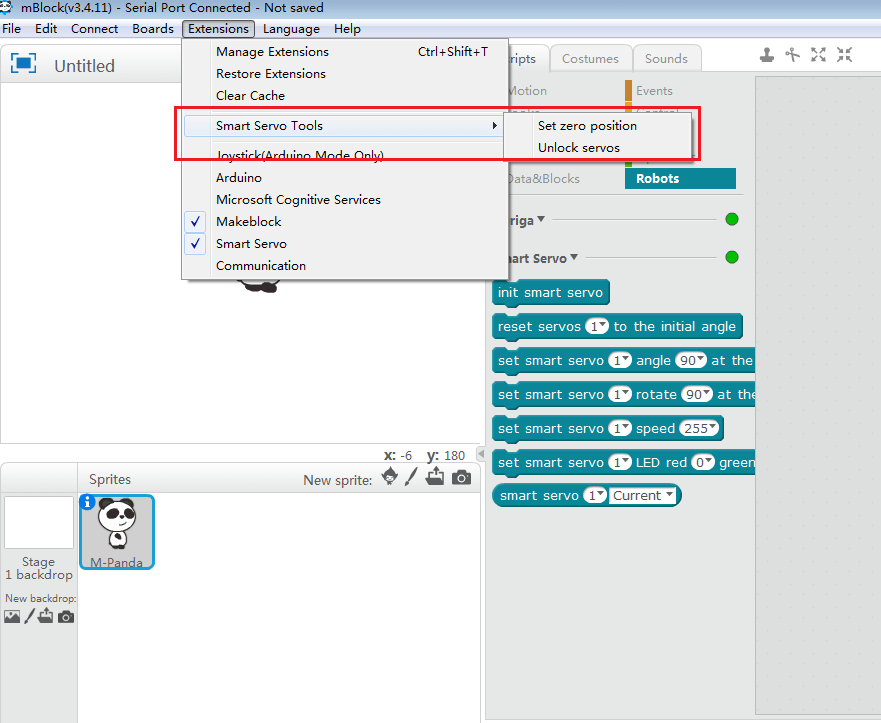
On the drop-down menu bar, Smart Servo has two settings: Set Zero Position and Unlock Servos.
Set Zero Position: when the Smart Servo is connected to the Auriga mainboard, click [Set Zero Position] to set the current servo position to 0°;
For example: When using the block [set the servo angle 90°]; the servo wheel will rotate to the absolute angle of 90° from the current position 0°;
Unlock Servos:If you need to manually adjust the angle when the servo has power , click [Unlock Servos] to return the servo to the free adjustment state;
[Block instructions]
![]()
Restore the Smart Servo to the default zero position; [parameter] represents the servo number (to get the serial number, refer to the servo instructions);
![]()
Rotate the servo to [Absolute Angle] 90° and set rotation at 30 revolutions/minute.
![]()
Rotate the servo to [relative angle] 90° and set rotation at 30 revolutions/minute.
![]()
Rotate the servo to speed of [-255 ~ 255] (“+” and “-” refers to direction);
![]()
Set the Smart Servo LED color and brightness;
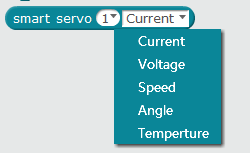
Return data of Smart Servo [current, voltage, speed, angle (absolute angle), temperature]
4.Programming example
4.1 Online programming
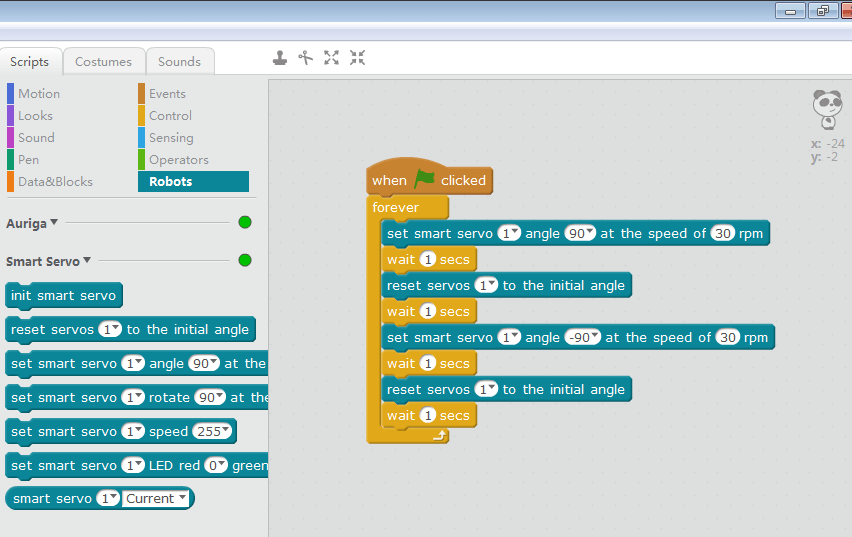
Drag the programming block you need from the Smart Servo block area to the corresponding interface. Then trigger the running program and the Smart Servo will begin.
4.2 Offline programming
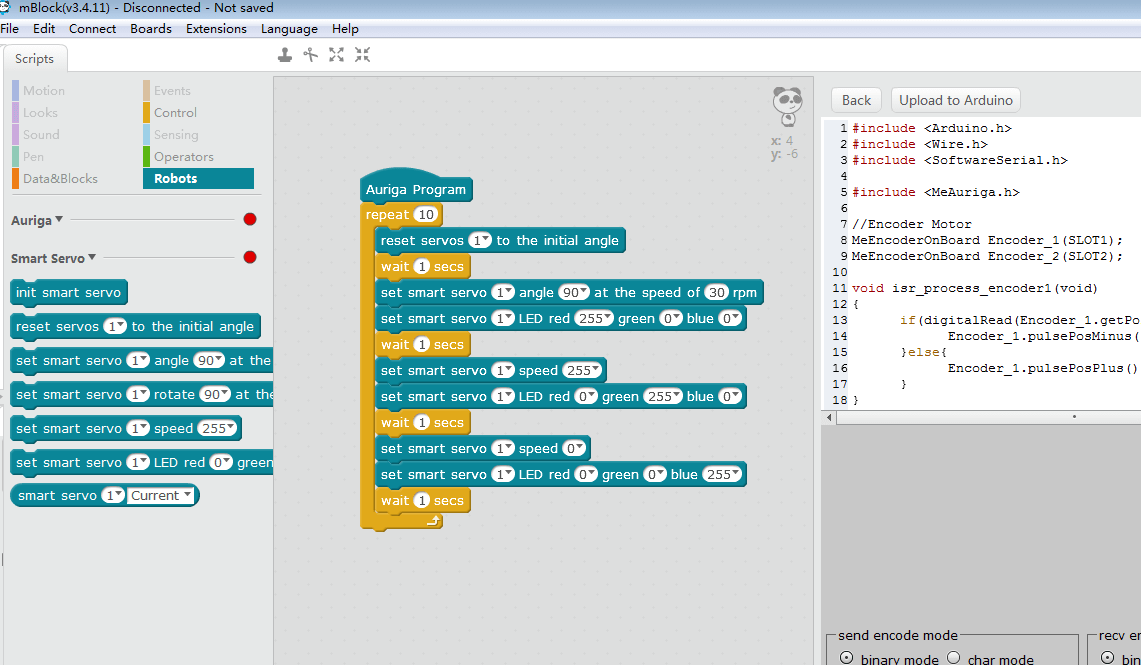
Programs written in mBlock can be uploaded to the Auriga mainboard and can run the Smart Servo while offline.
Select “Edit – Arduino Mode”
You can view the Arduino code on mBlock. Note: Programming should start with “main program block” (such as “Auriga program” as shown in the figure) when uploading; only the module below the main program block is valid.
5.Test environment
Windows version: Win10 Professional;
mBlock version: 3.4.6;
Smart Servo model: MS-12A
Power supply: 18650, 7.4V
Mainboard: Auriga
6.Notes
1,Before using mBlock to control the Smart Servo, upgrade Auriga to 3.46 and install the firmware;
2,The number of the COM port is different on different computers; find the right COM port by plugging and unplugging the Auriga mainboard;
3,The speed of the Smart Servo is (0 ~ 50) revolutions/minute; (-255~255) Smart Servo can be regarded as DC motor control;
Arduino programming introduction
1.Overview
Arduino is an open source platform which consists of easy-to-use hardware and software, including an integrated development environment (IDE) and database. The IDE is written in Java language and is based on the processing development environment. We provide a complete Arduino development environment for users.
2.Operation process
2.1Download and install the Arduino IDE
Windows : Arduino Uno
Mac OSX : Arduino Uno
2.2 Installing the Me Smart Servo Library File
1,Download the mesmartservo library zip file:https://github.com/Makeblock-official/MSmartServo-Driver/tree/master
2,Extract the compressed file to the Arduino default directory.
- The Arduino folder for Windows is as follows:
[arduino installation directory]\libraries\MSmartServo\src
[arduino installation directory]\libraries\MSmartServo\example
… - Arduino folder for Mac is as follows:
[arduino directory]\Contents\Java\libraries\MSmartServo\src
[arduino directory]\Contents\Javalibraries\ MSmartServo \example
… - Linux system follows accordingly.
3,Open the Arduino IDE. If it is already open, restart it.
4,Select “File – examples” to see the example code under the MSmartServo folder.
5,Me Smart Servo example:
- MSmartServoTestGetParameter: Prints the current angle, angular velocity, voltage, temperature and current value of the Smart Servo through the serial port;
- MSmartServoTestLockAndRelease: Provides a demonstration of the function of Smart Servo lock and release. The function of this example is that after the servo is turned to 180 degrees, the servo will be locked for 5 seconds, and the RGB light of the motor shows the locked state; then the servo is released. Rotate the servo 180 degrees, and release after 5 seconds being locked, and repeat the process. (The Smart Servo has the maximum torque during the locked state, and it cannot be turned manually before it is released)
- MSmartServoTestMove: the demonstration of the move() function in the servo drive library, showing the relative angle of the Smart Servo;
- MSmartServoTestMoveTo: the demonstration of the moveTo() function in the servo drive library showing the absolute angle of the Smart Servo;
- MSmartServoTestPWMMove: the demonstration of the PwmMove() function in the servo drive library showing the Smart Servo performing DC motor functions;
- MSmartServoTestRGBLedColorLoop: the demonstration of the RGB light function displayed in the servo drive library showing the color and brightness of the RGB light of the Smart Servo;
- MSmartServoTestRGBLedDisplay: the demonstration of the RGB light function displayed in the servo drive library showing that the Smart Servo cycle displays red, green and blue colors.
2.3 Port selection
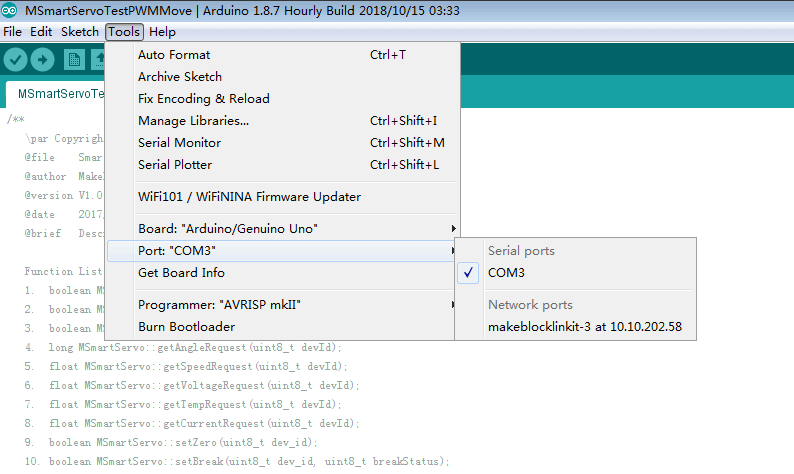
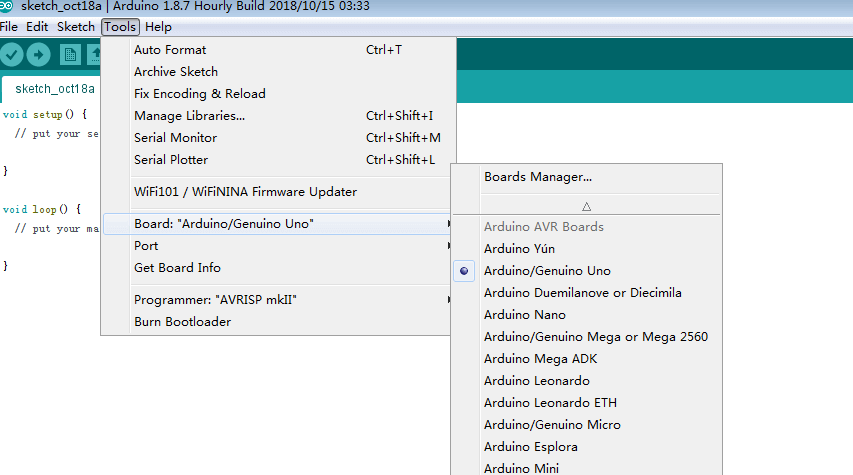
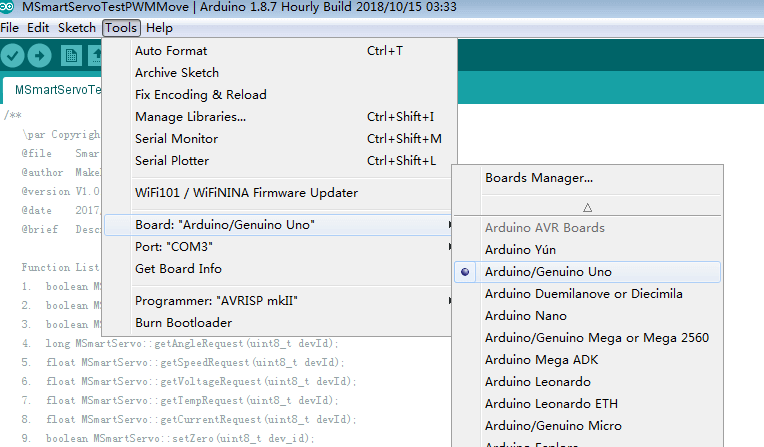
In the serial port selection of the Arduino IDE’s tool menu, you may see multiple COM ports. After connecting the Arduino board to the computer via USB, a new COM port will appear; select this COM port. (Note: the number of serial COM ports changes on different computers.)
After selecting the right serial port, select Arduino Uno in the boards option of Arduino IDE’s tool menu, and complete the Arduino software installation and configuration. Then you can learn how to use it.
2.4 Coding
Write code or open the corresponding example program in the Arduino IDE;
3.Basic example
Upload the DC motor function example code to the Smart Servo.
3.1 Connect the mainboard to computer with a USB cable.
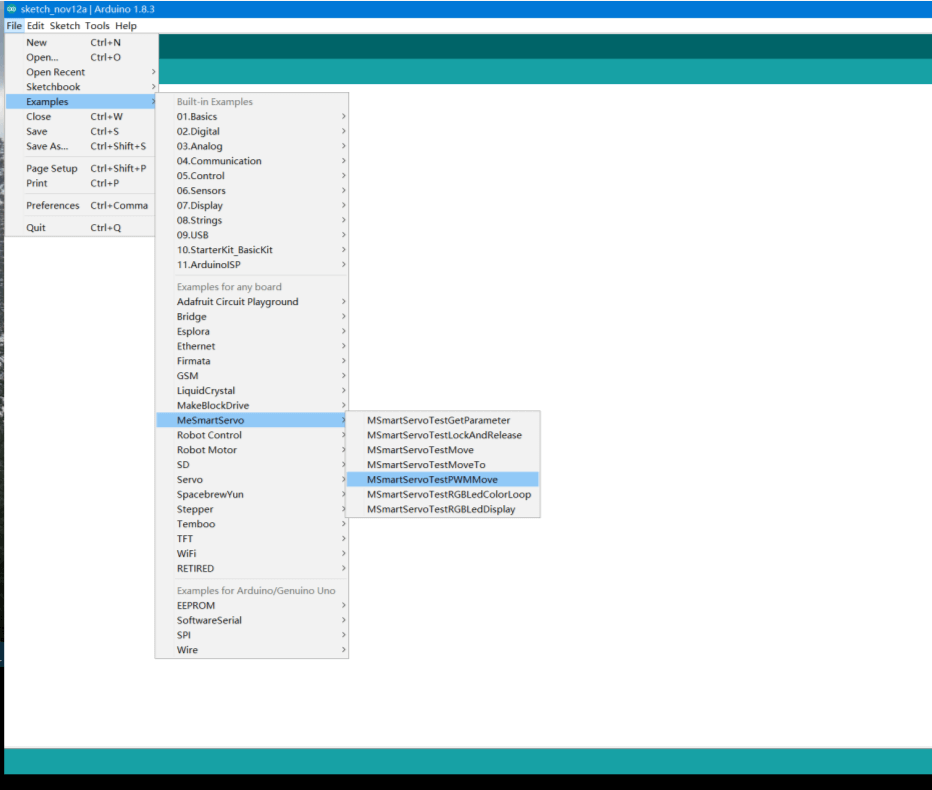
Select “File – Example – MSmartServo -MSmartServoTestPWMMove” in the Arduino IDE.
3.2 elect the corresponding mainboards Arduino UNO and COM port.
(Note: The number of the COM port is different on different computers)
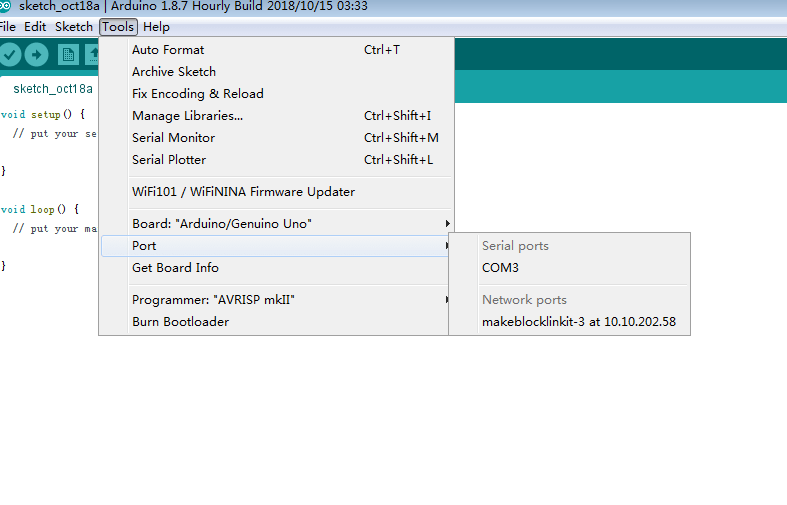
Select mainboard type
3.3 After pressing the upload button and waiting for a few minutes to compile, you can upload the code.

4.Test environment
Windows version: Win10 Professional;
Arduino version: 1.81;
Smart Servo model: MS-12A
Power supply: 18650, 7.4V
Master control board: Arduino UNO
5.Notes
1,When recording the program, first disconnect the signal line (TX/RX) of the Smart Servo from the mainboard to avoid error;
2,The number of the COM port is different on different computers; find the right COM port by plugging and unplugging the Arduino mainboard; ;
3,With different library example files, select the corresponding pin control carefully.
For information about the software serial port, please visit :https://www.arduino.cc/en/Reference/softwareSerial